Member work

Member work

Tuesday, 31 March 2020

Stitchery Stories Textile Art Podcast


Stitchery Stories is a textile art podcast set up by Susan Weeks, a textile art & embroidery enthusiast, and a member of Embroiderers' Guild Hull & East Riding Branch.

 Textile artists share their life in fabric and thread, and there are lots of links and notes for each episode.

The latest podcast is on Jane Austen Embroidery, the newly published book from Pavilion Books by Jennie Batchelor and Alison Larkin ... 
https://www.stitcherystories.com/janeaustenembroidery/


Friday, 27 March 2020

'Circles' project

This new project from Gill is simple, but super adaptable.  It can be done on paper or fabric, with or without stitch, by adults or as a useful activity with children or grandchildren over the Easter holidays.

The aim of the project is to create an abstract background onto which you can add focal points.


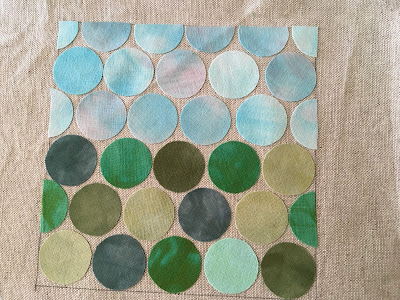
Gill started by drawing a 14cm x 14cm box on paper, and then filled it with circles drawn round a 2p coin.


"I wanted my first example to represent a landscape," says Gill, "so I coloured the top circles with different tones of blue and grey, and the bottom ones with tones of green and yellow.  To make the circles more random, I took a darker pencil crayon and drew on some circular marks.


The next step is now a matter of personal choice.  For example, if you have any old magazines to hand you could look through them for a suitably-sized animal to cut out - as you can see, Gill used a picture of a rabbit. Alternatively, you could cut out flowers from wrapping paper or an old birthday card.  Any paper pieces can then be glued in place.


Gill suggests further adaptations, depending on age,  
skill level and personal style:
  1. Draw the foreground focal point, e.g. animal, bird, vase of flowers, etc. instead of cutting it out.
  2. Repeat the project using autumn colours in the lower half and find leaves to either stick on or use as templates.
  3. Make an abstract drawing rather than a landscape by colouring the circles in vibrant colours and go to town with patterns.
  4. Draw the whole thing just using a black felt tip pen, and test your brain by putting a different tiny pattern in every circle.
  5. Cut each circle out of a magazine, finding the right colours, to create a collage picture.
Stitchers can adapt these instructions for fabric.
Cutting the blue sky and meadows from blue and green fabrics, add lots of hand or machine stitching around each circle for detail.  Note that the background does not need to be neutral or pale in colour.


It is useful to iron 'Heat & Bond' or 'Bondaweb' onto the back of the fabric before cutting out the circles.  If you don't have any, use a glue stick, but allow it to dry thoroughly before sewing on the sewing machine.

Finish with a focal point of, say, an animal, a garden pot filled with apples or flowers, or a watering can.  Further detail can be added with hand stitching and/or beading.


Flowers can be cut out of any floral fabrics you have to hand, such as cotton pieces or old curtains. This technique is called fussy cutting. The flowers are then stitched in place.  Make the vase on a separate piece, cut it out and apply it to the background before adding flowers, as shown.


Gill even managed to use the scraps  left on her sewing table:


Again, we do hope you will have a go at making a version of this project, and will send us photos of what you make.  We welcome your Comments, and please send photos to: 

leamingtondistrictitrep@embroiderersguild.co.uk 


Wednesday, 25 March 2020

Finished work

Thank you to Margherita for sending this photo of a lovely piece started at our January Members' Day.  Lots of different stitches creating interesting textures ...


Monday, 23 March 2020

TextileArtist Website / Stitch Challenge

If you haven't found it yet, TextileArtist.org is a website dedicated to promoting textile art (hence the name!), and is full of interesting articles, images and interviews with textile artists - ideal for a bit of inspirational browsing.  

From Tuesday 24th March, they are setting up a community stitch challenge:


"Every Monday for the next five weeks a different textile artist will deliver a burst of inspiration especially for you in the form of a short video workshop and a hand stitch challenge that you can do at home over the following few days."


What do I need to do to get involved?

  • First of all join the private Facebook group for the challenge here. It’s 100% free to take part.
  • Tomorrow once the first challenge video with Sue goes live we’ll send you an email to remind you to check it out and start stitching.
  • As you progress through the stitch exercise, we’d love to see what you’re creating so we’ll be encouraging you to post images of the work you create in the group. But there’s no pressure if you’d prefer not to share your results. That’s entirely your call.
  • Over the next few days, Sue will be in the Facebook group to get involved in conversations with you and your fellow stitchers and offer guidance when it’s needed.
  • Then on Friday at 3pm Sue will be doing a 30 minute Facebook live Q&A to answer your questions about the challenge.
But if you really don’t want to join Facebook, no worries! We’ll post the challenge video on the website later in the week so you can check it out there.

More lovely cards

Some members have been busy creating Mothers' Day and other greetings cards - lucky recipients!


Thursday, 19 March 2020

Mother's Day card

Hot off the sewing machine ...
Jenny has made a super card for her Mum (hope she isn't looking!) for Mother's Day.


We're very much looking forward to having more of your photos to post here.

Tuesday, 17 March 2020

Greetings cards project to while away the time ...

Since we are unfortunately going to have to cancel our Members' Day, talks and workshops for the next few months, we thought it would be nice to have a project to help fill all those empty hours!  And it's good to have something creative to focus on in what may be dark times ahead.

Dayschool Secretary, Gill, has developed this project, taking inspiration from Angie Lewin's glorious book, Plants and Places.

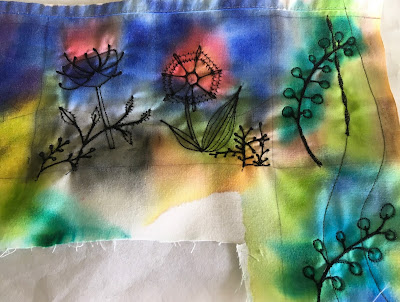
  • Start by marking up a piece of light-coloured fabric - I used a piece of an old cotton sheet (calico would also work well) - by drawing boxes using a ruler: 3 inches wide by 4 inches tall is a good size for a card.
  • In each box draw some simple abstract flowers using a pen or pencil, and in some draw a wavy line along the bottom third to denote the horizon.  (You can just see the pen-drawn shapes showing through in the image below.)

    • Then paint the fabric, starting with the focal point flower and finishing with the background.  Koh-i-nor paints were used for these examples, but Inktense or water colours, etc. could be used. The paint will bleed, but that will add to the beauty of the finished piece. 


    • When the fabric is dry (iron to dry if you are in a hurry) stitch along the drawn lines. Here they are stitched mainly in black thread by free machining, but you could use hand stitch.

    • Cut out each mini picture and mount it on a thin piece of fabric to support it while you stitch, e.g. a piece from your scrap bag, commercial backing fabric (or even paper recycled from packaging). You can then add some more decorative stitches and, if you wish, additional thread colours.

    • You can see in this picture that some of the leaves and centres of flowers have been emphasized by colouring them with e.g. Sharpie pens. If you really want to go to town, sparingly add some dots of metallic paint or beads or some hand stitching.

    • Most of the pictures were mounted on either blue or black felt, and the edges zig- zagged to neaten them. 

    • It was even possible to make further cards just by using the scraps left on the sewing table, see below:


    We would love to see what you make, so do please send your photos using the Comment Box, or send to leamingtondistrictitrep@embroiderersguild.co.uk .

    Wednesday, 11 March 2020

    Creative Embellishments with Hanny Newton


    Our recent workshop with Hanny Newton was exactly as billed: a day of exploring, creating and playing with beads and sequins, with the aim of creating a 'dictionary' of techniques to help us to push the creative limits in our work.

    First off, Hanny set us the challenge of sewing on beads in as many different ways as possible in 20 minutes.


    Then we cut up small pieces of painted acetate to form 'sequins' and stitched them onto fabric.  This exercise clearly sparked people's imaginations:


    Returning to slightly more traditional goldwork techniques, we cut and stitched gold and silver purl in patterns; and cut felt shapes, usually used for padding under silk or kid leather, and tried alternative ways of stitching them.
     
    Hanny Newton - Ways of stitching goldwork padding

    Hanny Newton - Goldwork padding

    What an inspiring and productive day we had ....